Social Networks and RSS Feeds
Instagram Instagram
About Andy


I am an avid adventurer, conservationist, teacher, and outdoor photographer whose photography celebrates the African landscape and its rich wildlife, people, and culture. My photographic safaris allow my travelers to not only enhance their understanding of photography, lighting, and wildlife, but to develop a life-long admiration for Africa ‘s beauty and culture.

Banana Republic recently used my photographs as the cornerstone of their Urban Safari campaign, and my images were seen in all 750 stores around the globe, as well as in their billboards, catalogs and annual report. I was also the winner of the BBC Wildlife Photographer of the Year in the ‘Wild Places’ category in 2008 and a highly commended in the ‘Creative Visions of Nature’ category in 2007.

I launched Gura Gear in 2008, in an attempt to deliver lightweight camera bags to the market. I was looking for a lightweight camera bag to hold all of my photographic gear, and there was nothing desirable on the market that suited my needs. After spending 2 years with many prototypes, the Gura Gear Kiboko bag was born. More products are now available on the Gura Gear web site.


Search
Friends

Entries in lightroom (10)

Monday
Dec122016

Photographic Processing and Believability

We are living in the golden age of photography; digital photography has matured and the tools available are robust and functional. The intersection of these magical cameras and raw file processing software brings up the subject of believable photographs. Why should a photograph need to be believable? It doesn’t, but this is often how viewers look at photographs. If an image is believable then the viewer can get past that hurdle and on to opinions of interpretation, quality, aesthetics, and how they actually feel about the photograph.

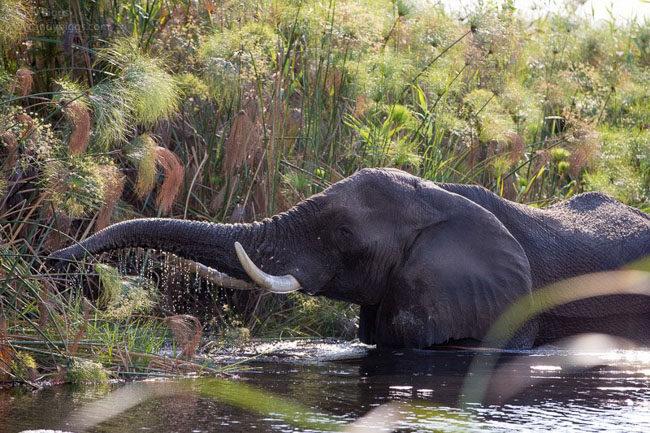
For example, I recently encountered an elephant (below) while on a boat in the Okavango Delta in Botswana. The color in this version of the photograph is unbelievable; I set the Saturation slider beyond what I would normally do. To illustrate my point, I doubt that many people will take a look at the actual content of the photograph after seeing how inappropriately I processed the image because the colors aren’t believable.


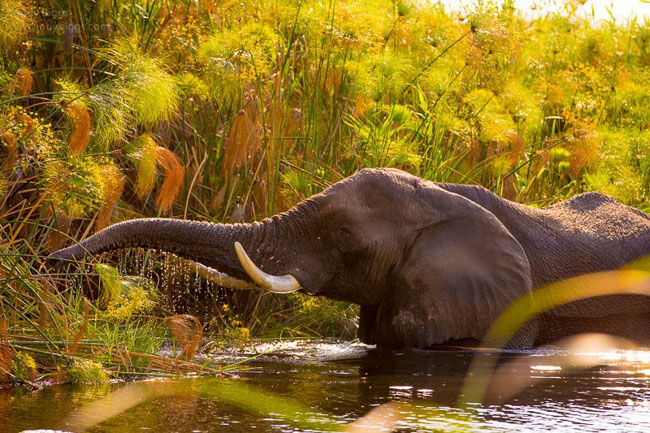
The second version of the same photograph (below) was edited more consistently with my normal processing style and language, and the image is more believable. You can move on to discussing how you feel about the image, whether or not you like it, what you think about the main subject, and so forth. But herein lies a challenge and a bit of a paradox for me: color photographs are often believable, but this also has the ability to limit our creativity at the same time. Interpretation of a scene or subject can be done in many different ways, from which lens you use, how far away you are, how you dodge, burn, select an overall color palette, and to where you crop (if at all).


The main point in discussing this is to propose the idea that believability changes when you work in color versus black and white. To use a metaphor, consider a box. What exists inside the box is everything believable and outside is everything not believable. For me, the box in the color world is much smaller than a box for black and white. Black and white photographs can be worked in more aggressive and more interpretive ways before a viewer fully understands or appreciates the amount of work done on the image. By removing the color, the reference points are also removed and the photographer is free to push outwards to expand that box and have more creativity and fewer constraints.

In the third example (below), the photograph has been processed in black and white and has much more work done to it in the areas of dodging, burning, and adjusting specific areas of contrast so that you can get past the believability factor and move on to more important things to consider, such as whether you like the image or not, or if it touches your soul.


Check out my new video series, Lightroom Simplifiedfor a more in-depth approach to creating believable images both quickly and efficiently. 13 videos, 3.5 hours of step-by-step instruction. 


Wednesday
Dec072016

Lightroom Simplified, my video series


If you struggle to understand the Develop module in Lightroom and want to learn a simple approach to the digital darkroom, giving you more time to be out there with your camera, you’re going to appreciate the video series I just created: Lightroom Simplified. 

Lightroom Simplified is a 3.5 hour video course in 13 episodes and covers my complete workflow in the Develop module of Lightroom. If you’ve traveled with me you know that what I love most is being out there, in the field, with my cameras, not fussing for hours over post-production. This approach is simple and efficient and covers my processes for both color and black & white images. It also includes a short bonus video that discusses organization and Lightroom Mobile. 

Lightroom Simplified can be both downloaded and streamed, and will give you the confidence to use the tools of Adobe Lightroom efficiently so you can get back to doing what you love: making photographs.

I’ve teamed up with Craft & Vision to get this into your hands. It will normally be $50 but it’s on sale for $40 for the first week.

Lightroom Simplified Video Tutorials


Sunday
Apr012012

Adobe Lightroom 4 Develop Processing Steps


I get asked many questions about my Adobe Photoshop Lightroom workflow, and I thought it would be a good exercise to jot the steps down, along with some random notes. This is a workflow that I use if I am out in the field and won’t be using my favorite plugins such as Nik Software’s Viveza 2 or Silver Efex Pro 2.

Library Module

Import

         Optional: metadata (copyright information goes into images)

         Optional: Preset development ‘recipe’

         Previews: standard


Develop Module

Crop (‘R’ keyboard shortcut)

Spot Removal

You can use either Clone or Heal. Just do whatever it takes to get what you want. Use the bracket keys ( [ and ] ) to increase/decrease size of the brush. Use Command and + or – to zoom in or out, and use the space bar to enable moving around within the frame.

Lens Corrections (If Available)

I rarely, if ever, do manual lens corrections. Perhaps I just don’t have the patience. J

Camera Calibration

Optional: camera profile, other than standard. You can create your own profile(s) with X-Rite ColorChecker Passport ($99)

White Balance

This is a creative tool, not a scientific tool. Just do what looks good. 5000 is mid-day light, and any movement of the slider to the right will warm up your image and to the left will be cooler.

Exposure

This sets the overall brightness. Unlike LR3, the Exposure slider does not set the white point. Hold down the ALT key when setting the Exposure to see what will be clipped or thrown away.

Contrast

This slider sets the overall contrast of your image. You will be able to fine tune the contrast with the next 4 sliders beneath it (Highlights, Shadows, Whites, Blacks).

Highlights

Think of this slider as anything that is bright but not too close to white. You can use this slider to brighten up your brights, without affecting the color of white. See Whites below for more. This is the easiest way to create or preserve a presence in your images.

Shadows

“Poor Man’s Fill Flash’. Use this to a minimum if possible. Overuse will cause an image to lack contrast. I do prefer to use the Tone Curve to be more specific, but this is a great tool for a broad stroke type purpose.

Whites

This used to be called the Recovery slider in LR3 and before, but this time the slider affects more tones.

Blacks

This slider affects the darkest areas of the image. I use this to set my black point as an anchor to

Clarity

Don’t do it. It’s like riding a scooter. It may be fun, but you don’t want your friends to see you doing it.

Vibrance

Newer version of Saturation slider. Non-linear in nature. It will increase saturation of less saturated colors faster than the colors that are already saturated.

Saturation (if not using Vibrance)

I never use this, as it is a blunt tool that will make it easy to blow out your most vivid color in your scene.

Tone Curve

I start off by increasing Lights and decreasing Darks by opposite, but equal amounts. (ex: +10 and -10). I typically am more dramatic with the Lights and Darks and the Highlights and Shadows are closer to zero. When working with B&W images, all bets are off and I do whatever it takes to get contrast. I usually start off with a Medium Contrast curve, but sometimes do use the Linear or Strong ones. It just depends.

HSL (Hue / Saturation / Luminance)

Use the targeted adjustment tool. Click on the little circle to ‘undock’ the tool. Go to your image and click and drag up or down to affect the H / S or L values of all similar tones/colors in the image. Poor Man’s Polarizer = Increase saturation on sky and decrease Luminance on sky. Make sure you have a nice blue in the sky to begin with.

Split Toning

Used only for B&W images. I use nothing for Highlights and a range of 40-50 for Hue and Saturation of between 5 and 20 for the Shadows. This creates a nice split tone warm image, without dulling the highlights.

Sharpening

I usually only vary the Amount and Masking. To use the Mask, hold down the Option/Alt key to see what is going to be sharpened.

Noise Reduction

I only vary the Luminance slider, and rarely go beyond 15 or 20. If the image is underexposed by more than a stop, you may need to slide the Color slider to the right to eliminate stray pixels that are blue or red (easy to detect).

Post-Crop Vignetting

Use sparingly. Remember it is uniform around all edges, so it might be visible. I use something like a negative 5 to 10 for the amount, and the Feather of around 80 (less sharp gradient).

Grain

I sometimes have to add grain to a B&W image that I am printing really really big. The goal is to fill in the gaps and mask out some of the issues with a lower megapixel file.

Graduated Filter (M)

I use to darken skies. I only use Brightness, and never Exposure, as Exposure weakens the whites in clouds.

Click and drag from beginning of where you want to darken and end where you want to end. The longer the drag, the longer the gradient effect is. Hold down SHIFT key to make the gradient a 90 degree / straight line.

Adjustment Brush (K)

I use this brush for many purposes. I can:


  • dodge and burn
  • paint contrast into a small area like a face of a cat
  • brighten eyes
  • increase clarity on clouds
  • local use of noise reduction
  • warm up / cool down an area of the scene with the Temp slider


Hold down ALT key to remove areas that you didn’t mean to brush. Use bracket keys to increase/decrease brush size.

Keyboard Shortcuts


  • R = crop
  • G = grid view (Library module)
  • E = Loupe view (Library module)
  • D = Develop module
  • Tab = toggles left/right panels
  • F = different full frame views
  • CTRL and ‘+’ = zooms in when using a tool that can be zoomed in
  • ‘space bar’ = move around within an image
  • O = Overlay view


Sunday
Nov132011

Adobe Lightroom 3 is 50% off at $149 at Amazon.com


Well, the sales keep coming in. Adobe now has Lighroom on sale for $149, which is 50% off. Talk about a stupendous deal.

Adobe Photoshop Lightroom 3 for $149 at Amazon.com

Adobe Photoshop Lightroom 3 for $149 at B&H

Thursday
Jun302011

My Lightroom 3 Processing steps


I get asked many questions about my Adobe Photoshop Lightroom workflow, and I thought it would be a good exercise to jot the steps down, along with some random notes. This is a workflow that I use if I am out in the field and won’t be using my favorite plugins such as Nik Software’s Viveza 2 or Silver Efex Pro 2.


Library Module

Import

         Optional: metadata (copyright information goes into images)

         Optional: Preset development ‘recipe’

         Previews: standard

Develop Module

Crop (use ‘R’ key for quick access)

Crop image

Level the horizon

Spot Removal - You can use either Clone or Heal. Just do whatever it takes to get what you want. Use the bracket keys ( [ and ] ) to increase/decrease size of the brush.

Lens Corrections

Camera Calibration - Optional: camera profile, other than standard. You can create your own profile(s) with X-Rite ColorChecker Passport ($99)

White Balance - This is a creative tool, not a scientific tool. Just do what looks good. 5000 is mid-day light, and anything higher is warmer and anything lower is cooler.

Exposure - This sets the whitest / brightest area of the image. Hold down the ALT key when setting the Exposure to see what will be clipped or thrown away. Image my look horrible.

Blacks - This sets the darkest / black area of the image. Hold down the ALT key when setting the Blacks to see what will be clipped or thrown away. Image may look horrible.

Brightness - This is what sets the distribution between the black and white points in the image. It is what makes the image ‘look good’.

Recovery - Optional: use the Recovery slider to recover blown highlights. Pay attention that the overuse of this tool will make all whites look grey and dull (I see this all too often).

Fill Light - “Poor Man’s Fill Flash’. Use this to a minimum if possible. Overuse will cause an image to lack contrast.

Contrast - This is a very very blunt tool, and my preference is to use the Tone Curve (see below) to introduce contrast.

Clarity - Don’t do it. It’s like riding a scooter. It may be fun, but you don’t want your friends to see you doing it (just kidding). In all seriousness, overuse of this tool will cause your images to look outdated in a couple of years when this look is out of fashion. In other words, I only use it sparingly, and typically only with the Brush tool on specific areas.

Vibrance - Newer version of Saturation slider. Non-linear in nature. It will increase saturation of less saturated colors faster than the colors that are already saturated.

Saturation (if not using Vibrance) - I never use this, as it is a blunt tool that will make it easy to blow out your most vivid color in your scene.

Tone Curve - I start off by increasing Lights and decreasing Darks by opposite, but equal amounts. (ex: +10 and -10). I typically am more dramatic with the Lights and Darks and the Highlights and Shadows are closer to zero. When working with B&W images, all bets are off and I do whatever it takes to get contrast. I usually start off with a Medium Contrast curve, but sometimes do use the Linear or Strong ones. It just depends.

HSL (Hue / Saturation / Luminance) - Use the targeted adjustment tool. Click on the little circle to ‘undock’ the tool. Go to your image and click and drag up or down to affect the H / S or L values of all similar tones/colors in the image.

Poor Man’s Polarizer = Increase saturation on sky and decrease Luminance on sky. Make sure you have a nice blue in the sky to begin with.

Split Toning - Used only for my B&W images. I use nothing for Highlights and a range of 40-50 for Hue and Saturation of between 5 and 20 for the Shadows. This creates a nice split tone warm image, without dulling the highlights.

Detail - I usually only vary the Amount and Masking. To use the Mask, hold down the Alt key to see what is going to be sharpened.

Noise Reduction - I only vary the Luminance slider, and rarely go beyond 15 or 20. If the image is underexposed by more than a stop, you may need to slide the Color slider to the right to eliminate stray pixels that are blue or red (easy to detect).

Post-Crop Vignetting - use sparingly. Remember it is uniform around all edges, so it might be visible. I use something like a negative 5 to 10 for the amount, and the Feather of around 80 (less sharp gradient).

Grain - I sometimes have to add grain to a B&W image that I am printing really really big. The goal is to fill in the gaps and mask out some of the issues with a lower megapixel file.

Red-Eye

Graduated Filter (M) - I use to darken skies. I only use Brightness, and never Exposure, as Exposure weakens the whites in clouds. Click and drag from beginning of where you want to darken and end where you want to end. The longer the drag, the longer the gradient effect is. Hold down SHIFT key to make the gradient a 90 degree / straight line.

Adjustment Brush (K) - I use this brush for many purposes. I can:

dodge and burn

paint contrast into a small area like a face of a cat

brighten eyes

increase clarity on clouds

Hold down ALT key to remove areas that you didn’t mean to brush. Use bracket keys to increase/decrease brush size.

Keyboard Shortcuts

R = crop

G = grid view (Library module)

E = Loupe view (Library module)

D = Develop module

Tab = toggles left/right panels

F = different full frame views

CTRL and ‘+’ = zooms in when using a tool that can be zoomed in

‘space bar’ = move around within an image

Monday
Apr042011

Hot Air Balloon Fiesta and Adobe Lightroom Workshop, October 2011

Workshop Date: October 7-9, 2011

Workshop Leaders: Andy Biggs and Michael Clark

Location: Albuquerque, New Mexico


About The Workshop

This extended weekend workshop will be a combined classroom workshop with outdoor photographic shoots. The workshop coincides with the Albuquerque International Balloon Fiesta, which is the world’s largest balloon festival. All classroom instruction will be centered around Adobe Photoshop Lightroom v3.

Workshop Schedule

Day 1 - Afternoon (2pm until dinner time)
Lightroom 3 and the Library module.

Day 2 - Morning
Dawn Patrol: Early morning shoot at the Albuquerque Hot Air Balloon Fiesta.

Day 2 - Late Morning  and all afternoon
Lightroom 3 and the Develop module

Day 3 - Morning
Dawn Patrol: Early morning shoot at the Albuquerque Hot Air Balloon Fiesta.

Day 3 - Late Morning and all afternoon
Lightroom 3 and the Develop module. Michael and Andy will work with participants to develop images taken over the weekend, as well as will assist in portfolio reviews.

Computers will not be provided but participants with laptops are encouraged to bring them. Following along on your own laptop is a hands-on way of learning what is being taught in the classroom.


The Cost
The cost of this workshop is $495 per person. The same rate applies for each participant regardless of whether they are doing photography and participating in the workshop, or not. A nonrefundable deposit of $125 is required to secure your spot on the workshop. Final balance will be due no later than September 1, 2011.

Accommodations
The classroom portion of the workshop will be held at the Albuquerque Marriott Pyramid North, however there are many hotels in the nearby area from which to choose.

Transportation
Most major airlines service Albuquerque, New Mexico. Once in Albuquerque, you can take one of the many shuttles to your hotel. Rental cars are available at the airport.

We do not provide transportation during the workshop. Please plan ahead and reserve a rental car. Of course, we will share vehicles and car pool to make life easier for all of us. We are not responsible for reimbursement of non-refundable airline tickets in the event of a workshop cancellation.

Workshop Materials
All participants will be given a copy of Michael’s e-book entitled Adobe Photoshop Lightroom:
 A Professional Photographer’s Workflow, which details his complete workflow from start to finish. 

You will need to bring the following equipment with you:
• a 35mm digital SLR camera with interchangeable lenses
• a laptop computer with a USB memory key, DVD or external hard drive. Instructors will be using Mac.
• Adobe Photoshop Lightroom software installed on your computer (you can download the 30-day trial version of Lightroom before the workshop if you don’t already have the software.)
• Digital memory cards with a card reader (preferably CompactFlash or Secure Digital Cards)
• power adapters and cables for laptop and digital camera
• camera manual
• batteries and charger for rechargeable batteries

It is expected that you know how to download images from your camera to the laptop, know basic editing techniques using your software, and are able to organize the edited images for critique.


Registration
If this workshop has your name on it, then now is the time to register. Remember, there will be limited space available for this workshop. When they’re spoken for, that’s it. If you have any questions before registering, send us an e-mail with any inquiries to info@andybiggs.com.

$125 to hold your place until September 1 with a deposit.


Testimonials from last year’s workshop

“Thanks to Andy and Michael for a wonderful, educational, experienced based workshop in New Mexico. Today I reread my notes from the classroom work and have been amazed at how deeply informative it was. Michael’s Lightroom Book as well as yours about digital printing have given me a whole new level of understanding especially around the Lightroom Develop module as well as on the entire topic of printing and color management. I really appreciate how you and Michael showed your individual processes for image workflow. Comparing and contrasting both methods allowed me to take the best of both and adapt them to fit my needs. My increase in knowledge along with the additional hands on guidance we got in the photo sessions at the Albuquerque Balloon Festival will enable me going forward to make the best photos I’m capable of producing.”

“Andy, I’ve taken several photography seminars over the past few years. Without a doubt your’s has been the most informative, well organized, openly sharing event I’ve attended.”

“Thanks again for all your help and guidance. It’s clear you don’t hold back when teaching and sincerely want all attendees to get as much out of the seminars as we’re able to absorb.”

”..my mind is still spinning and I can’t help but smile every time I think of the wonderful experience garnered from our workshop. Between what I learned from the two of you, as well as from my talented classmates - this was a great experience, and I would do it again.”

Friday
Mar262010

Adobe Lightroom & The Fine Art Digital Print

Workshop Date: October 7-10, 2010

Workshop Leaders: Andy Biggs and Michael Clark

Location: Hotel Santa Fe, Santa Fe, New Mexico


About The Workshop

This 4-day workshop will be a combined classroom workshop with outdoor photographic shoots. The workshop coincides with the Albuquerque International Balloon Fiesta, which is the world’s largest balloon festival and will certainly be one of our photographic destinations. All classroom instruction will be centered around Adobe Photoshop Lightroom v3.x, as well as the craft of creating a fine art digital print.

Workshop Schedule

Day 1 - Morning
Lightroom introduction. The modules: Library, Develop, Slideshow, Print and Web

Day 1 - Afternoon
Portrait lighting sessions Part I, outdoors

Day 2 - Morning
Dawn Patrol: Early morning shoot at the Albuquerque International Balloon Fiesta.

Day 2 - Afternoon
Lightroom and the Develop module

Day 3 - Morning
How to select inkjet papers
Printing from Lightroom and Photoshop

Computers will not be provided but participants with laptops are encouraged to bring them. Following along on your own laptop is a hands-on way of learning what is being taught in the classroom.

Day 3 - Afternoon
Portrait lighting sessions Part II, indoors

Day 4 - Morning
Dawn Patrol: Early morning shoot at the Albuquerque International Balloon Fiesta.

Day 4 - Afternoon
Hands-on printing with current large format printers on the market. Paper provided by Moab Paper.
Participants leave with one fine art print of their own work!


About the Instructors
Michael Clark is an internationally published outdoor photographer specializing in adventure sports, travel and landscape photography. He produces intense, raw image of athletes pushing their sports to the limit and has risked life and limb on a variety of assignments to bring back stunning images of rock climbers, mountaineers, kayakers and mountain bikers in remote locations around the world. He contributes to National Geographic, National Geographic Adventure, Sports Illustrated, Outside, Men's Journal, Backpacker, Outdoor Photographer, Digital Photo Pro, Climbing, Alpinist, Rock and Ice, Bike Magazine and The New York Times among many others. You can see Michael's work at www.michaelclarkphoto.com.

Andy Biggs is an avid adventurer, conservationist, teacher, and outdoor photographer whose photography celebrates the African landscape and its rich wildlife, people, and culture. With a deep respect and understanding for African wildlife, Andy unfolds the world of the Serengeti onto our doorstep with striking emotional depth. His photographic safaris allow the traveler to not only enhance their understanding of photography, lighting, and wildlife, but to develop a life-long admiration for Africa 's beauty and culture.

The Cost
The cost of this workshop is $1250 per person (inclusive of light breakfasts either in our teaching space or in the field). The same rate applies for each participant regardless of whether they are doing photography and participating in the workshop, or not. A nonrefundable deposit of $350 is required to secure your spot on the workshop. Final balance will be due no later than September 1, 2010.

Please note: We will attempt to adhere to this itinerary as much as possible. However, certain conditions, such as bad weather, may necessitate changes in the itinerary. We reserve the right to alter any itinerary at any time, if necessary.

Accommodations
The classroom portion of the workshop will be held at the Hotel Santa Fe. We have negotiated a group rate that is discounted from their advertised prices if you would like to stay at Hotel Santa Fe. Please inquire if interested.

Transportation
Most major airlines service Albuquerque, New Mexico, which is approximately 60 miles south of Santa Fe. Once in Albuquerque, you can take one of the many shuttles to your hotel in Santa Fe. Shuttle costs are approximately $25 - $30. Rental cars are available in Albuquerque, Santa Fe and from the hotel. The Hotel Santa Fe is located in downtown Santa Fe, within walking distance to shopping, restaurants and entertainment.

We do not provide transportation during the workshop. Please plan ahead and reserve a rental car. Of course, we will share vehicles and car pool to make life easier for all of us. We are not responsible for reimbursement of non-refundable airline tickets in the event of a workshop cancellation.

Workshop Materials
All participants will be given a copy of Michael’s e-book entitled Adobe Photoshop Lightroom:
 A Professional Photographer's Workflow, which details his complete workflow from start to finish.

You will need to bring the following equipment with you:
• a 35mm digital SLR camera with interchangeable lenses
• a laptop computer with a USB memory key, DVD or external hard drive. Instructors will be using Mac.
• Adobe Photoshop Lightroom software installed on your computer (you can download the 30-day trial version of Lightroom before the workshop if you don’t already have the software.)
• Digital memory cards with a card reader (preferably CompactFlash or Secure Digital Cards)
• power adapters and cables for laptop and digital camera
• camera manual
• batteries and charger for rechargeable batteries

It is expected that you know how to download images from your camera to the laptop, know basic editing techniques using your software, and are able to organize the edited images for critique.

$350 to hold your place until September 1 with a deposit.


Testimonials from last year's workshop

"Thank you and Michael for a wonderful, educational, experienced based workshop in Santa Fe. Today I reread my notes from the classroom work and have been amazed at how deeply informative it was. Michael's Lightroom Book as well as yours about digital printing have given me a whole new level of understanding especially around the Lightroom Develop module as well as on the entire topic of printing and color management. I really appreciate how you and Michael showed your individual processes for image workflow. Comparing and contrasting both methods allowed me to take the best of both and adapt them to fit my needs. My increase in knowledge along with the additional hands on guidance we got in the three photo sessions for aspen fall colors, Albuquerque Balloon Festival, and Abiquiu landscape site, will enable me going forward to make the best photos I'm capable of producing. Showing the class the image evaluation image printed on many different papers was most informative as was printing a few of our individual "best" photos from the week.

Andy, I've taken several photography seminars over the past few years. Without a doubt your's has been the most informative, well organized, openly sharing event I've attended.


Thanks again for all your help and guidance. It's clear you don't hold back when teaching and sincerely want all attendees to get as much out of the seminars as we're able to absorb."


"Hi Andy & Michael,


It was a pleasure to meet you both and I enjoyed the workshop a lot. I found Michael's well written e-book and in-class lecture on Lightroom very informative and I gained new insight it's operation features that I wouldn't have discovered on my own. The full printing workflow has always been a mystery to me, and thus I dismissed printing and never did much of it. When I first signed up for the workshop I considered the "fine art printing" aspect to not be the main reason why I attended, but this was the part of the workshop that I learned the most from - Andy's explanations and experience helped me to appreciate and better understand the full workflow from the proper paper selection (I didn't realize there were so many choices) to correct evaluation of output and will serve to encourage me to print more of my pictures.

Thanks for the great workshop!"
 

"Your workshop at Santa Fe was too good and I came away with a lot of knowledge and renewed energy. The level of expertise that you and Michael shared was topnotch and I hope to repeat this experience again. Thanks for such a great workshop!"

"..my mind is still spinning and I can't help but smile every time I think of the wonderful experience garnered from our workshop. Between what I learned from the two of you, as well as from my talented classmates - this was a great experience, and I would do it again."

Wednesday
Oct142009

Behind the scenes photos from our Lightroom and the Fine Art Digital Print workshop

Here are some behind the scenes photographs from our most recent workshop. All images copyright ©2009 Michael Clark.


Indoor teaching session on fine art digital printing


On our first afternoon, we saw the first snowfall of the year up near the Santa Fe ski basin


Trevor, our resident gear hound, putting his Hasselbad to work


Liftoff at the Balloon Fiesta


We spent an afternoon taking a nice hike near Georgia O'Keefe's home at Abiquiu, New Mexico