Social Networks and RSS Feeds
Instagram Instagram
About Andy


I am an avid adventurer, conservationist, teacher, and outdoor photographer whose photography celebrates the African landscape and its rich wildlife, people, and culture. My photographic safaris allow my travelers to not only enhance their understanding of photography, lighting, and wildlife, but to develop a life-long admiration for Africa ‘s beauty and culture.

Banana Republic recently used my photographs as the cornerstone of their Urban Safari campaign, and my images were seen in all 750 stores around the globe, as well as in their billboards, catalogs and annual report. I was also the winner of the BBC Wildlife Photographer of the Year in the ‘Wild Places’ category in 2008 and a highly commended in the ‘Creative Visions of Nature’ category in 2007.

I launched Gura Gear in 2008, in an attempt to deliver lightweight camera bags to the market. I was looking for a lightweight camera bag to hold all of my photographic gear, and there was nothing desirable on the market that suited my needs. After spending 2 years with many prototypes, the Gura Gear Kiboko bag was born. More products are now available on the Gura Gear web site.


Search
Friends

Entries in Techniques (23)

Wednesday
Feb022011

Meerkat Photography - How To

As I indicated in an earlier blog entry, I visited Tswalu Kalahari in November 2010 for 3 nights. I loved all of the photographic subjects on the reserve, but I enjoyed photographing the resident meerkats the most. This blog entry is a quick recap of my experience with the meerkats, and how I chose to shoot them.

Meerkats live in family groups called ‘mobs’ or ‘gangs’, and are part of the mongoose family (Suricata suricatta). Meerkat mobs are often made up of around 20 or more individuals, and the mob I spent time with had between 40 and 50. Meerkats live in burrows, and when the sun rises in the morning you can wait outside of a burrow to watch them come out and warm themselves in the early morning light. Within 15 or 20 minutes, all of the mob can be found above ground, and then they collectively take off to forage for the day. This is when the photo ‘event’ is over.

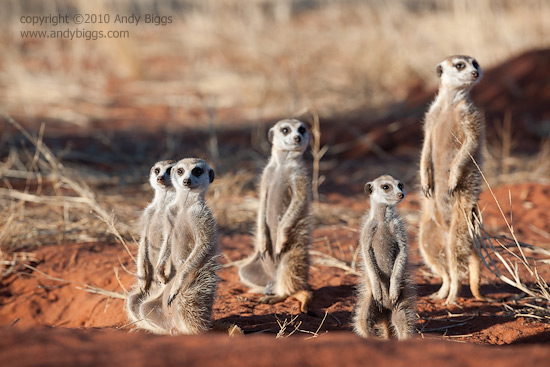
The most obvious way to photograph meerkats are with them looking into the camera, which means the sun is over your shoulder. This is a challenge, to say the least, because 1) your shadow often gets in the way, 2) the colors are not very vibrant at this angle, and 3) there is a lack of dramatic light. Remember that light illuminates and shadows define. Shadows are not a bad thing!


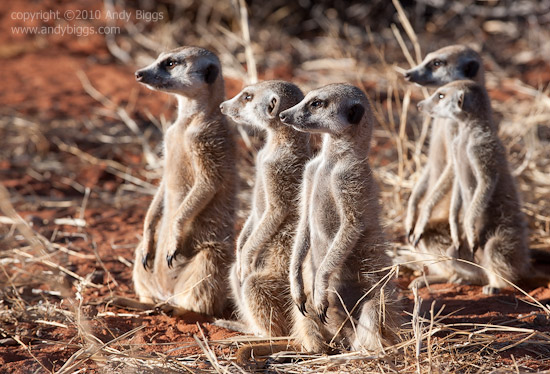
Cluttered background, and my subjects are sitting on the ground. The sun is 90 degrees to camera left, which doesn’t exactly give much dramatic light.


Here is a similar angle, and I had issues with the foreground chopping off the lower legs of some of my subjects. I do like that I was able to get all of their eyes in the photo, though.


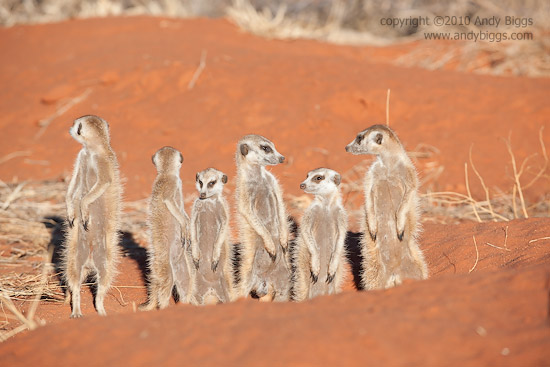
Ugh, extremely flat light. Not optimal in any way. This is light over the shoulder.


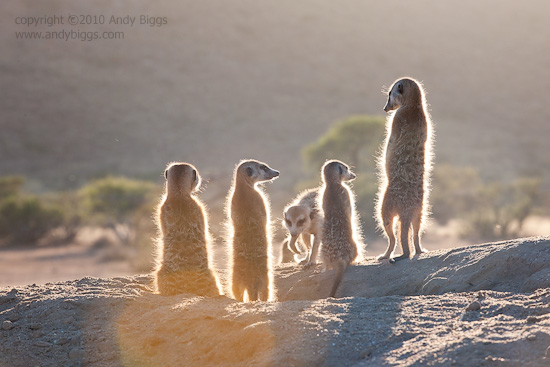
Ok, it was time to start photographing into the sun, with meerkats looking away from the camera. This had the most dramatic light, however the only angles which worked had such an angle to the sun that always brought sun flare into my lens. So, time for a solution…..


We decided to attach pieces of paper to the lens hoods on our lenses, with the help of rubber bands. Voila!


Now we were able to photograph into the sun without lens flares. This brought a combination of dramatic light, color as well as ‘rim light’ on the meerkats.


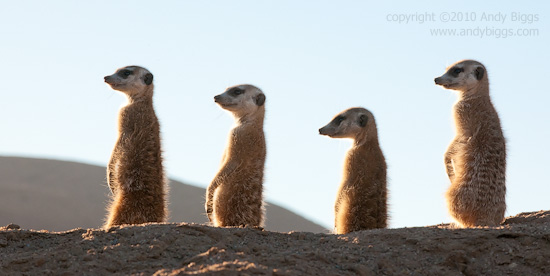
Ok, back to some sidelighting. This was an angle that worked, primarily because of the blurred background.


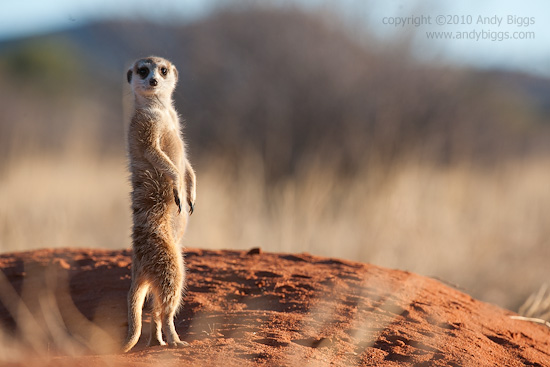
I finally found an angle where I could get meerkats standing up, a clean background and dramatic lighting.


All in all, I had a great time photographing the meerkats. I want to spend more time in the future, as I did find them a bit of a challenge to get exactly what I wanted. Tswalu Kalahari did a great job explaining meerkat society and behavior, and they watched which burrow the meerkats went in at the end of each day. This allowed us to know exactly which burrow to wait at when the sun came up, wasting no time.

Friday
Sep042009

Photo of the Day


Legadema

Mombo Camp, Botswana. July 2009

Nikon D3, 200-400mm f/4 VR, 1/200sec @ f/4, ISO 12,800

I know, I have been inundating this blog with photos of Legadema lately, however I thought this image would be an interesting study because of the technical details of the image. Did you notice that it was captured at ISO 12,800? Yes, this is a bit extreme, but the sun had gone down 15 minutes earlier, and rather than go back to camp we sat and enjoyed her company for a little while longer. I used Noise Ninja to clean up the noise a tad, and I used Nik Software's Viveza to brighten her up and have her more visually separated from the backgroud.

Photographing a leopard is likely some of the most challenging situations in wildlife photography. You either have one in a tree with extreme light/dark contrast, or you have one on the ground with grass and twigs in the way. Nature is inherently messy, and it is our job as photographers to try and eliminate the clutter by using our shooting position and our focal length to try and isolate our subjects.

As a rule of thumb, I like to instruct my safari travelers by rating items that show up in a scene. You can think of each item in your viewfinder as being positive, neutral or negative. Eliminate the negatives, get as many positives as you can, and neutrals are just going to be there. The branch that is coming out of her head is a negative, however you can reduce it somewhat by using visual tricks to get a viewer's eye to not notice it as much. In this example I brightened her up and darkened the background, as to give visual preference to one thing over another.

Trick: make your subject brighter than the background, as brighter objects tend to attract a viewer's eye. This is why lions sitting in the shade, underneath a tree with a bright background generally isn't a very successful photograph. Wait until your subject has a clean background that is also darker than your subject, and you have instantly created a luminance contrast that is in your favor.

Trick: try to find your subject in a different hue than the background, and you now have a case of hue contrast. In the image above the reflected light in the background (and on the subject) has blue-ish, and the subjects bright yellow coat (even though it is in cool shadow light) is warm. Now you have a warm / blue hue contrast that also helps separate the background from the subject.

Monday
Mar232009

Workflow Friday

Jason Moore has a wonderful blog, with postings from many well known photographers. I was recently asked to participate in his Workflow Friday series of posts, and I chose to walk through a typical series of layers one on of my black and white images of a leopard in a tree.

Click on the image below to read the entire entry.

Sunday
Oct122008

One on One Printing mentoring

If you are interested in creating better photographic prints, I am now offering private full-day mentoring sessions at my printing studio. This is an opportunity for you and I to work side by side to create beautiful prints from your own digital files. We can work on whatever you wish to work on, from digital capture to Lightroom workflow to digital output. The world is your oyster, and I am here to assist. Typical items that are usually covered:

  • Color management
  • Lightroom processing and workflow
  • Soft proofing
  • Black and white printing
  • What to look for in a good print
  • Paper choices
  • Print sharpening
  • Upsizing files for large format output
  • Editing images for a portfolio
  • Mat cutting and presentation ideas

These sessions are very informal, and are designed around getting information to you that is relative to your goals.


My location and equipment

Here is the equipment that I have in my studio in Houston, Texas (Memorial area, west of downtown):

  • Canon iPF 8300 large format 44” 12-ink pigment ink printer
  • Epson Stylus Pro 3880 17” pigment ink printer
  • Epson Stylus R2400 13” pigment ink printer
  • Epson Stylus R2880 13” pigment ink printer
  • Epson Stylus R3000 13” pigment ink printer
  • Canon PRO-1 13” pigment ink printer
  • Canon PRO-10 13” pigment ink printer
  • Canon PRO-100 13” dye ink printer
  • Mac Pro desktop
  • Dual LCD displays (NEC PA-272W 27” and Apple 30” Cinema)
  • X-Rite i1 and iO scanning table for profiling
  • X-Rite iSis
  • GTI display booth with D50 light source
  • Epson V750 flatbed scanner
  • Plenty of workspace to layout prints
  • All Moab Paper products, including Colorado Fiber Satine, Entrada Bright 300gsm, Somerset Museum Rag, Silckrock Metallic Pearl as well as Crane Silver Rag, Epson Exhibition Fiber, Hahnemuhle Fine Art Pearl and Photo Rag.

The Cost

The cost of this all day (10 hours) session is $950, and will include the use of all printing materials, matting materials and perhaps the use of my assistant’s time if he is around to help out. A typical day will begin at 8am, and will end around 6pm. I have found it best to have a casual lunch break away from the studio to break the long day up. Oh, and lunch is on me. I also have an espresso maker in the office for those who need caffeine at all hours of the day.

The Signup process

All you need to do is to send me an email at andybiggs@gmail.com, and we can take it from there. My schedule is busy with Gura Gear and my photographic safaris, but we can carve out some time that works for both of us.

Friday
Jul252008

African Photo Safari Tips

This was originally posted on my old web site, and now I am moving over to my blog. - Andy

1) Bracket the difficult exposures if shooting film, or learn how to read histograms on digital cameras. When photographing wildlife, you typically have dark bodies against light backgrounds, which are one of the most difficult situations to expose for. An incident meter is also a great idea.

2) Know your equipment before you depart for your safari trip. Learning to use a new camera in the field will most likely end up as that: a test. Bring along the manual for your camera(s)!

3) Bring along a bean bag, or some other means to support your camera. A stable camera platform is preferable to hand holding. I prefer the Kinesis Safari Sack product.

4) Bring the longest lens that you can afford. There will be many shots that will be close, and there will be many that are far away. Having the best tool for the job will definitely help. In 35mm terms, a 400mm lens is a great starting point.

5) You should try and take your best photographs within the first hour of sunlight, and the last hour of sunlight. The closer the sun is to the horizon, the warmer and more dramatic your shots will be.

6) Try to practice the 'rule of thirds'. By offsetting your subject away from the center of the frame, you will create nice negative space that has balance and harmony to your images. After you have practiced the rule of thirds, start breaking the rules. Rules are meant to be broken, especially if you want to think creatively.

7) At the very end of the day, when the sun is below the horizon, flash photography is a must. I have found that a Better Beamer or Flash X-Tender attached to your flash can illuminate wildlife farther away than you might think. Better Beamers are also great to put the catch light in the eyes of a far away mammal or bird. There are 3 reasons for using flash: flash as your main light (brigher than the ambient light), flash as fill light and flash as catchlight. Understand the differences, and how to use your flash for each of these situations.

8) Learn more about the wildlife you would like to photograph. You will be amazed at the abundance and variety of wildlife in east Africa, and how they interrelate. I recommend The Safari Companion by Richard Estes.

Friday
Jul252008

Depth of Field for Wildlife Photography

This was originally posted on my old web site, and now I am moving over to my blog. - Andy

Wildlife photography comes with many challenges, both creatively and technically. On the creative side, composition is the single most important decision you will make in your images. Other things are certainly important, but composition will carry an image if other aspects are not as strong. On the other hand, if you already have your creative areas covered and need more help with the technical aspects of your images, consider this brief introduction to depth of field for wildlife photography a good start.

"Why worry about depth of field? I mean, I spent all of this money on a fast telephoto lens, why not shoot wide open all of the time?" I often hear this type of statement while out on safari, along with additional tidbits like "don't I always want the fastest shutter speed possible?" or "I don't want to have to think about my depth of field. Shooting wide open takes that decision away." Ok. Let's dive in.

In my photographs, before I click the shutter I have already decided what is the most important part of the image. In other words, I have already decided what the subject is. It is this decision that will determine the technical aspects of my photos. Using different apertures on my lenses will help determine, or display, what is important and what is not important to the viewers of my photographs. Increasing or decreasing the depth of field allows me the control that I need. The challenge arises when I want to accomplish many things that appear contradictory. For example, in the image below, I wanted to have the eyes and nose all in focus, but have the background blurred. If I have to stop down (increase the aperture number) from f/4 to about f/5 or f/5.6 to have enough depth of field to have the eyes and nose sharp, I really haven't given up my blurred background.


Canon 1DsMkII, 400mm f/4 DO IS, f/5.0 @ 1/640sec, ISO 250

Here is a quick crop of the eyes and nose. I could have stopped down a little more, but I was trying to strike the balance between a blurred background, which usually requires f/2.8 to f/4 at moderate distances, and a sharp subject. One of the techniques that I use is mid-point focusing. In other words, if I need both the eyes and nose in focus, I will focus in the space in between them. This image is a near-miss, but I am still happy with it. Notice that the eyes are sharp, as well as the teeth, but not quite on the nose.

Here is another example of a missed opportunity. Somewhat of a grab shot, but I always try to take images with babies or action in them. Here we have a mother and baby giraffe in Serengeti National Park, Tanzania. I used a 500mm lens on a Canon 5D camera, and I had only a second to grab a shot before they walked away. Well, I only had one shot, and the shot didn't work out, as I grabbed the shot at f/4. Not enough depth of field for both the mother's head and the baby's head. If you look closely at the image, you can easily see that the mother's head is likely to be 4 to 6 feet behind the baby's head. Something to think about when examining a scene.


Canon 5D, 500mm f/4 L IS, 1/200sec @ f/4, ISO 200

And here is the cropped area. Notice how the mother is dead sharp and the baby isn't sharp at all. Strike that up to not enough depth of field. The entire head area was important to me on both of them, so I missed the mark on this shot. 

So how does one determine the proper aperture for a given goal? Here are some great resources that illustrate both depth of field concepts and products that you can take with you out in the field. Understand the relationship between focal length, subject distance and aperture. All three are related to each other, and it takes a while to get a hang of it. I know instinctively that with my 500mm f/4 lens at 50 feet, I am usually shooting between f/8 and f/14, depending on how large my subject is. I will need much more depth of field for a zebra that is looking directly at the camera than if I am shooting a bird of prey that is looking sideways, or a profile look. The zebra will require about 24 inches of depth of field from its nose to is ears, and an eagle that is looking sideways might only require 4 inches of depth of field. When in doubt, stop down more than you think you need. F/14 is very common in my world. You will be surprised at how you can still reach your goal of having a blurred background, while having all of your subject in focus.

Here is an example of when you can have a tack sharp subject and a blurred background. One of the tricks is to try to avoid cluttered background, which helps separate your subject from the rest of the image. In this next shot, I used f/11 to make sure that I had all of the fine detail of the grass in focus. So my subject increased from the lioness to the surrounding area. The lines of the grass complement the angle of the lioness, so I chose to emphasize this by increasing the depth of field. I have found that for my 500mm f/4 lens in east Africa, where my subjects range from 25 to 75 feet away, I use f/8 to f/11 75% of the time. And I tend to stop down more to f/14 or more on a regular basis. I rarely use f/4 to f/5.6, unless I am in dire need of a faster shutter speed.

Canon 1DMkII, 500mm f/4 L IS, f/11 @ 1/200 sec, ISO 250

Conclusion

Depth of field control is both a tool to convey what is important in your image, as well as it is a control to help de-emphasize what is not important in your image. Learn what the depth of field is at common apertures for different focal lengths at different distances. Your understanding of these variables will go a long way in controlling how your subjects are portrayed in your images.


Wednesday
Jul162008

Photo of the Day

Raging Elephant

Serengeti National Park, Tanzania, January 2008

Canon EOS 1DMkIII, 100-400mm @ 180mm, 1/8 sec @ f/8, ISO 100

This isn't a raging elephant as stated in the title, but rather an impression of what I am trying to convey. This bull was walking beside our vehicle for a good 5 minutes, and he would go from one side of the vehicle to the next. After eating a clump of tall grass, he would sometimes do a quick shake of the head before moving on. I was trying some push/pull blurring techniques of slowing the shutter down and zooming in or out when the shutter was pressed. Not many of these experiments were successfull, but it was a fun few minutes. Keep in mind that as photographers we are storytellers, and it is up to you to define the tone, gesture and mood of your photographs. This can be done in many different ways, and my approach was to use a blurred zoom to show a sense of movement that could be interpreted as rage.

Friday
Jun202008

Printer profiling: Wondering what media type to choose?

If you create your own ICC profiles for your inkjet printer, you should be interested in understanding which media type to select when printing off targets that are ultimately read by your spectro. Scott Martin of Onsight has created a nifty image entitled the Onsight Media Selection Image that helps you determine which is the best media type to use.

Onsight_Media_Selection_small.jpg

thumnail of Onsight's Media Selection image 

Why does this matter? From Scott's web site:

"This 5×7 color image is intended to be used by advanced users to determine a media’s optimal media selection prior to the profiling process. If you have a 3rd party paper and you aren’t quite sure which media selection to use in the printer driver, simply print this image without a profile several times with different media selections. When the prints come out run your finger across the smudge test area to see if the the ink is drying at an acceptable rate. Compare the final prints for maximum black density (DMax), color gamut, shadow detail and dot smoothness. You’ll want to choose the media selection that delivers the best DMax without loosing a significant amount of shadow detail (loosing 5% or less is OK), or without a course dot pattern caused by what I call “micro pooling” (where dots touch due to excessive ink)."

Scott adds:

"Once you have determined the optimal media selection then one can print a profiling target and generate an ICC profile that delivers optimal results. I do this constantly onsite on my client’s printers (as well as my own) and keep a running list of the results. By doing so, I often find that I can get better results than with a paper manufacturer’s recommendation. Hats off to those that question conventional wisdom and do there own quantitative testing."

You can download the image from Onsight's web site by clicking here.