Photo of the Day
 Friday, September 4, 2009 at 09:33AM

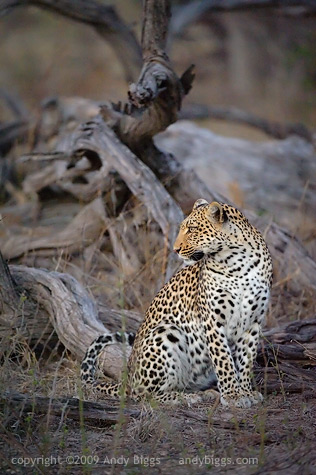
Legadema
Mombo Camp, Botswana. July 2009
Nikon D3, 200-400mm f/4 VR, 1/200sec @ f/4, ISO 12,800
I know, I have been inundating this blog with photos of Legadema lately, however I thought this image would be an interesting study because of the technical details of the image. Did you notice that it was captured at ISO 12,800? Yes, this is a bit extreme, but the sun had gone down 15 minutes earlier, and rather than go back to camp we sat and enjoyed her company for a little while longer. I used Noise Ninja to clean up the noise a tad, and I used Nik Software's Viveza to brighten her up and have her more visually separated from the backgroud.
Photographing a leopard is likely some of the most challenging situations in wildlife photography. You either have one in a tree with extreme light/dark contrast, or you have one on the ground with grass and twigs in the way. Nature is inherently messy, and it is our job as photographers to try and eliminate the clutter by using our shooting position and our focal length to try and isolate our subjects.
As a rule of thumb, I like to instruct my safari travelers by rating items that show up in a scene. You can think of each item in your viewfinder as being positive, neutral or negative. Eliminate the negatives, get as many positives as you can, and neutrals are just going to be there. The branch that is coming out of her head is a negative, however you can reduce it somewhat by using visual tricks to get a viewer's eye to not notice it as much. In this example I brightened her up and darkened the background, as to give visual preference to one thing over another.
Trick: make your subject brighter than the background, as brighter objects tend to attract a viewer's eye. This is why lions sitting in the shade, underneath a tree with a bright background generally isn't a very successful photograph. Wait until your subject has a clean background that is also darker than your subject, and you have instantly created a luminance contrast that is in your favor.
Trick: try to find your subject in a different hue than the background, and you now have a case of hue contrast. In the image above the reflected light in the background (and on the subject) has blue-ish, and the subjects bright yellow coat (even though it is in cool shadow light) is warm. Now you have a warm / blue hue contrast that also helps separate the background from the subject.
 Botswana,
  Mombo,
  Technique,
  africa,
  safari in
  Photo of the Day,
  Techniques


Reader Comments (8)
A fantastic image and some great tips, thanks Andy.
Hi Andy,
Thanks for the great tips and tricks to your fantastic photo's that really pop like no others I have seen. Very much appreciated.
JP
Andy,
Prior to reading your commentary, what hit me was how the image popped. I noted the dof, but my first thought was that the background may have been slightly desaturated or blended with a B&W layer. I see in the write-up that you brightened the Leopard but is the background shade the natural? regardless, nice shot for such high ISO and good lessons in the article.
BTW, I use the Nik Dfine 2.0 for noise reduction and prefer it's control over Noise Ninja - but I am still waiting from my camera body with no noise at 12,800.
Buddy, no desaturation or anything like that on the background. Just simple dodging and burning going on here, but in Viveza. I am loving Viveza, as it takes away the difficulty of creating masks and also I can do my brightness/darkness, contrast and saturation adjustments in one easy step. Highly recommended plugin.
Regarding all technicality of the image, I noticed a second head in a background, looking in a same direction. No comment.
huh? Second head in the background? There is no other leopard in this image. No comment about your 'no comment'. :-)
This head that I see, is wooden :), on top of the leopard. It looks more like a zebra. But newer mind.
Ok. I see what you are talking about. :)