Social Networks and RSS Feeds
Instagram Instagram
About Andy


I am an avid adventurer, conservationist, teacher, and outdoor photographer whose photography celebrates the African landscape and its rich wildlife, people, and culture. My photographic safaris allow my travelers to not only enhance their understanding of photography, lighting, and wildlife, but to develop a life-long admiration for Africa ‘s beauty and culture.

Banana Republic recently used my photographs as the cornerstone of their Urban Safari campaign, and my images were seen in all 750 stores around the globe, as well as in their billboards, catalogs and annual report. I was also the winner of the BBC Wildlife Photographer of the Year in the ‘Wild Places’ category in 2008 and a highly commended in the ‘Creative Visions of Nature’ category in 2007.

I launched Gura Gear in 2008, in an attempt to deliver lightweight camera bags to the market. I was looking for a lightweight camera bag to hold all of my photographic gear, and there was nothing desirable on the market that suited my needs. After spending 2 years with many prototypes, the Gura Gear Kiboko bag was born. More products are now available on the Gura Gear web site.


Search
Friends

Entries from July 1, 2008 - July 31, 2008

Wednesday
Jul302008

July 2009 Botswana safari announcement

I am leading a photographic safari in Botswana next July, and I am excited to start talking about it. It was taken a while to plan, so here are the quick highlights:

Trip Name: Botswana: The Premier Wildlife Safari

Dates: July 19-28, 2009

Where: Botswana, Africa

Trip Highlights:

  • We will have private vehicles during the entire safari, with only 1 person per row of seating.
  • A virtually unlimited amount of weight per person of up to 180 pounds. Bring as much gear as you can! Standard weight allowance is typically only 44 pounds by comparison.
  • This safari offers superb game viewing and photographic opportunities in some of the best areas in Southern Africa.
  • We will have the option of photographing aerial shots from a helicopter (additional fees apply).
  • We will stay at three different camps, Kwetsani Camp, Savuti Camp and Chitabe Camp.
  • There is an optional extension to the famed Mombo Camp.
Trip details can be found on my Safaris and Workshops page.


The cost of this safari is $13,990, and a 20% deposit is required to secure your spot(s). I put a teaser on my safaris and workshops page a few months ago, and have had a decent amount of interest as a result. If you are interested, please drop me a line at info@andybiggs.com or use the Contact form on this blog.
Monday
Jul282008

Adobe Lightroom 2.0 released


For those that have been waiting for Adobe Lightroom to be released, well wait no further! Here is a quick link to purchase a full version, upgrade version or a fully functioning demo.

Adobe Lightroom 2.0

Why do I like Lightroom 2.0? Primarily because of 2 features: local adjustments and much better print sharpening, which sharpens based on the output and resolution of your images. This technology came from the expertise over at Pixel Genius. No more need to run Photokit Sharpener any more.

From Photoshop News:

Photoshop Lightroom 2: Smarter, Faster and More Accurate
The enhanced Library module in Lightroom 2 helps streamline and accelerate photographers’workflows. With the ability to visually organize images across multiple hard drives, Lightroom 2 and its powerful Library Filter Bar makes it easy for users to quickly find the images they need. The Suggested Keywords feature helps photographers keyword their images by making intelligent suggestions based on their own previous efforts. New dual-monitor support allows users to expand their workspace, giving them flexibility to edit and organize images in a way that maximizes an additional display.

In the Develop module, the new Local Adjustment Brush lets photographers fine-tune specific areas of an image to precisely adjust color, exposure and tonal range without affecting other areas of the image. The new Graduated Filter expands the toolbox in Lightroom, allowing for edits to larger areas by applying gradually diminishing or increasing adjustment effects such as exposure, clarity, and saturation, alone, or in any combination. Lightroom 2 also helps photographers print more efficiently by quickly arranging photos of multiple sizes on one or many pages with flexible and customizable templates to maximize paper and ink. Intelligent algorithms automatically determine optimal sharpening for screen or print, producing crisper images faster.

Ground-Breaking Innovation in Raw Technology
New raw technology gives photographers access to flexible camera profiles. Camera profiles are the visual starting point for the raw processing workflow, but image preferences vary for every photographer. To minimize surprises, Adobe is supplying default camera profiles that closely emulate the visual looks that photographers are used to seeing from their favorite camera, while also providing the ability to create highly customized profiles to suit different tastes. Camera profiles are available for immediate download on Adobe Labs (http://labs.adobe.com) for use with Lightroom 2 and Camera Raw 4.5, along with the DNG Profile Editor for the community to test and create their own profiles.

The Adobe Camera Raw 4.5 plug-in and DNG Converter 4.5 are also now available on Adobe.com and support over 190 camera models including the Olympus E 420 and E 520 models.

“One of the big reasons why Lightroom has become such a phenomenon among serious photographers is that Adobe built it with the input of a very vocal user community,” said Scott Kelby, president of the National Association of Photoshop Professionals (NAPP). “Adobe really listens to the issues and challenges today’s photographers face and they’ve built a complete solution that not only meets the needs of photographers; it really feels like it was made just for us. The enhancements to Lightroom 2, combined with the power of Photoshop, give photographers the ultimate freedom to produce professional images quickly.”


Friday
Jul252008

Recommended Reading

Here is a short list of books, both educational and artistic, that I recommend. Some of the books below have helped fuel my passion for nature photography, as well as for tools that helped me along the way. I would love to hear any suggestions you might have, if I have left any 'gotta have' books off this list.

The Safari Companion by Richard Estes

Mountain Light: In Search of the Dynamic Landscape by Galen Rowell

Inner Game of Outdoor Photography by Galen Rowell

Africa by Art Wolfe

The Living Wild by Art Wolfe

Broken Spears: A Maasai Journey by Elizabeth Gilbert

My Seregenti Years by Myles Turner

Whatever You Do, Don't Run: True Tales of a Botswana Safari Guide by Peter Allison

Africa by Sebastiao Salgado

Vanishing Africa by Mirella Ricciardi

The Last of the Nuba by Leni Riefenstahl


Friday
Jul252008

African Photo Safari Tips

This was originally posted on my old web site, and now I am moving over to my blog. - Andy

1) Bracket the difficult exposures if shooting film, or learn how to read histograms on digital cameras. When photographing wildlife, you typically have dark bodies against light backgrounds, which are one of the most difficult situations to expose for. An incident meter is also a great idea.

2) Know your equipment before you depart for your safari trip. Learning to use a new camera in the field will most likely end up as that: a test. Bring along the manual for your camera(s)!

3) Bring along a bean bag, or some other means to support your camera. A stable camera platform is preferable to hand holding. I prefer the Kinesis Safari Sack product.

4) Bring the longest lens that you can afford. There will be many shots that will be close, and there will be many that are far away. Having the best tool for the job will definitely help. In 35mm terms, a 400mm lens is a great starting point.

5) You should try and take your best photographs within the first hour of sunlight, and the last hour of sunlight. The closer the sun is to the horizon, the warmer and more dramatic your shots will be.

6) Try to practice the 'rule of thirds'. By offsetting your subject away from the center of the frame, you will create nice negative space that has balance and harmony to your images. After you have practiced the rule of thirds, start breaking the rules. Rules are meant to be broken, especially if you want to think creatively.

7) At the very end of the day, when the sun is below the horizon, flash photography is a must. I have found that a Better Beamer or Flash X-Tender attached to your flash can illuminate wildlife farther away than you might think. Better Beamers are also great to put the catch light in the eyes of a far away mammal or bird. There are 3 reasons for using flash: flash as your main light (brigher than the ambient light), flash as fill light and flash as catchlight. Understand the differences, and how to use your flash for each of these situations.

8) Learn more about the wildlife you would like to photograph. You will be amazed at the abundance and variety of wildlife in east Africa, and how they interrelate. I recommend The Safari Companion by Richard Estes.

Friday
Jul252008

Depth of Field for Wildlife Photography

This was originally posted on my old web site, and now I am moving over to my blog. - Andy

Wildlife photography comes with many challenges, both creatively and technically. On the creative side, composition is the single most important decision you will make in your images. Other things are certainly important, but composition will carry an image if other aspects are not as strong. On the other hand, if you already have your creative areas covered and need more help with the technical aspects of your images, consider this brief introduction to depth of field for wildlife photography a good start.

"Why worry about depth of field? I mean, I spent all of this money on a fast telephoto lens, why not shoot wide open all of the time?" I often hear this type of statement while out on safari, along with additional tidbits like "don't I always want the fastest shutter speed possible?" or "I don't want to have to think about my depth of field. Shooting wide open takes that decision away." Ok. Let's dive in.

In my photographs, before I click the shutter I have already decided what is the most important part of the image. In other words, I have already decided what the subject is. It is this decision that will determine the technical aspects of my photos. Using different apertures on my lenses will help determine, or display, what is important and what is not important to the viewers of my photographs. Increasing or decreasing the depth of field allows me the control that I need. The challenge arises when I want to accomplish many things that appear contradictory. For example, in the image below, I wanted to have the eyes and nose all in focus, but have the background blurred. If I have to stop down (increase the aperture number) from f/4 to about f/5 or f/5.6 to have enough depth of field to have the eyes and nose sharp, I really haven't given up my blurred background.


Canon 1DsMkII, 400mm f/4 DO IS, f/5.0 @ 1/640sec, ISO 250

Here is a quick crop of the eyes and nose. I could have stopped down a little more, but I was trying to strike the balance between a blurred background, which usually requires f/2.8 to f/4 at moderate distances, and a sharp subject. One of the techniques that I use is mid-point focusing. In other words, if I need both the eyes and nose in focus, I will focus in the space in between them. This image is a near-miss, but I am still happy with it. Notice that the eyes are sharp, as well as the teeth, but not quite on the nose.

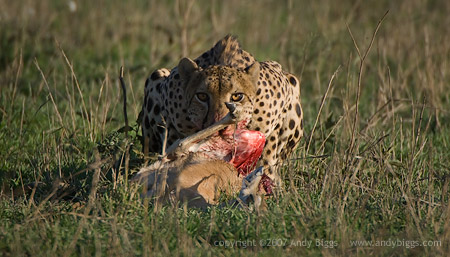
Here is another example of a missed opportunity. Somewhat of a grab shot, but I always try to take images with babies or action in them. Here we have a mother and baby giraffe in Serengeti National Park, Tanzania. I used a 500mm lens on a Canon 5D camera, and I had only a second to grab a shot before they walked away. Well, I only had one shot, and the shot didn't work out, as I grabbed the shot at f/4. Not enough depth of field for both the mother's head and the baby's head. If you look closely at the image, you can easily see that the mother's head is likely to be 4 to 6 feet behind the baby's head. Something to think about when examining a scene.


Canon 5D, 500mm f/4 L IS, 1/200sec @ f/4, ISO 200

And here is the cropped area. Notice how the mother is dead sharp and the baby isn't sharp at all. Strike that up to not enough depth of field. The entire head area was important to me on both of them, so I missed the mark on this shot. 

So how does one determine the proper aperture for a given goal? Here are some great resources that illustrate both depth of field concepts and products that you can take with you out in the field. Understand the relationship between focal length, subject distance and aperture. All three are related to each other, and it takes a while to get a hang of it. I know instinctively that with my 500mm f/4 lens at 50 feet, I am usually shooting between f/8 and f/14, depending on how large my subject is. I will need much more depth of field for a zebra that is looking directly at the camera than if I am shooting a bird of prey that is looking sideways, or a profile look. The zebra will require about 24 inches of depth of field from its nose to is ears, and an eagle that is looking sideways might only require 4 inches of depth of field. When in doubt, stop down more than you think you need. F/14 is very common in my world. You will be surprised at how you can still reach your goal of having a blurred background, while having all of your subject in focus.

Here is an example of when you can have a tack sharp subject and a blurred background. One of the tricks is to try to avoid cluttered background, which helps separate your subject from the rest of the image. In this next shot, I used f/11 to make sure that I had all of the fine detail of the grass in focus. So my subject increased from the lioness to the surrounding area. The lines of the grass complement the angle of the lioness, so I chose to emphasize this by increasing the depth of field. I have found that for my 500mm f/4 lens in east Africa, where my subjects range from 25 to 75 feet away, I use f/8 to f/11 75% of the time. And I tend to stop down more to f/14 or more on a regular basis. I rarely use f/4 to f/5.6, unless I am in dire need of a faster shutter speed.

Canon 1DMkII, 500mm f/4 L IS, f/11 @ 1/200 sec, ISO 250

Conclusion

Depth of field control is both a tool to convey what is important in your image, as well as it is a control to help de-emphasize what is not important in your image. Learn what the depth of field is at common apertures for different focal lengths at different distances. Your understanding of these variables will go a long way in controlling how your subjects are portrayed in your images.


Thursday
Jul242008

New web site launched!

My new web site was launched yesterday, and hopefully my updated DNS entries have made it around the globe by now. My old web site was all hand coded by me, and let me tell you how difficult it was to maintain. It wasn't easy, because every page was hand coded, and when I started using Dreamweaver a few years ago it started inserting all sorts of bloated clode into my web pages. Wanting to get away from that type of maintenance headache, I decided to work with Jack Brauer of Widerange Galleries, and he has an amazing content management system designed specifically for photographers.

My new system is now php based, and has a great admin utility where I can manage all aspects of the site. Here is a quick rundown of the new features, both visible to the public and not:

  • Slideshow on home page
  • Optimized for search engines
  • Easy creation, modification and deletion of galleries
  • Easy management of print prices, sizes and finishes such as framing
  • Direct photo uploading
  • New way of presenting images in galleries: frames, drop shadows, and meta data
  • Shopping cart for better and easier print sales
  • Discounts for print sales
  • Integrated mailing list, although I am not using this feature.
  • Web page templates for quick publishing

These are only some of the benefits that I am seeing. I removed my Articles section that I had on my old web site, and in the following days I will migrate the old content into this blog.

I hope you enjoy the new web site. The overall design hasn't changed that much, but the entire plumbing behind the scenes is all brand new. A huge thank you to Widerange Galleries and Jack Brauer for doing all of the heavy lifting. You are the greatest. Seriously. My past experiences with oursource web development hasn't been so rosy, and you have changed my attitude from this experience.

If you are a photographer and need a new web site, you really should take a look at what Widerange is doing with other photographers' sites. Great stuff.

Sunday
Jul202008

Leopard savaging a crocodile is caught on camera

Wow. This has to be one of the most fascinating and rare sequences in the wildlife world.

Check out this link to see some amazing photographs of a leopard taking out a nile crocodile. Simply amazing.

"A series of incredible pictures taken at a South African game reserve document the first known time that a leopard has taken on and defeated one of the fearsome reptiles. The photographs were taken by Hal Brindley, an American wildlife photographer, who was supposed to be taking pictures of hippos from his car in the Kruger National Park.

The giant cat raced out of cover provided by scrub and bushes to surprise the crocodile, which was swimming nearby.

A terrible and bloody struggle ensued. Eventually, onlookers were amazed to see the leopard drag the crocodile from the water as the reptile fought back. With the crocodile snapping its powerful jaws furiously, the two animals somersaulted and grappled. Despite the crocodile's huge weight and strength, the leopard had the upper hand catching its prey by the throat.

Eventually the big cat was able to sit on top of the reptile and suffocate it.

In the past, there have been reports of crocodiles killing leopards, but this is believed to the first time that the reverse scenario has been observed."

"I drove away, elated in disbelief. It may have been the most amazing thing I've ever seen."

Ellie Rose, a reptile keeper at London Zoo, said: "Normally, crocodiles are well able to defend themselves against attack. I can't think of any examples of this happening before."


Friday
Jul182008

Photo of the Day

20071016_174318_Serengeti054.jpg

Cheetah and gazelle

Serengeti National Park, Tanzania. October 2007

Nikon D2x, 200-400mm f/4, 1.7x, 1/500 sec @ f/7.1, ISO 400