Social Networks and RSS Feeds
Instagram Instagram
About Andy


I am an avid adventurer, conservationist, teacher, and outdoor photographer whose photography celebrates the African landscape and its rich wildlife, people, and culture. My photographic safaris allow my travelers to not only enhance their understanding of photography, lighting, and wildlife, but to develop a life-long admiration for Africa ‘s beauty and culture.

Banana Republic recently used my photographs as the cornerstone of their Urban Safari campaign, and my images were seen in all 750 stores around the globe, as well as in their billboards, catalogs and annual report. I was also the winner of the BBC Wildlife Photographer of the Year in the ‘Wild Places’ category in 2008 and a highly commended in the ‘Creative Visions of Nature’ category in 2007.

I launched Gura Gear in 2008, in an attempt to deliver lightweight camera bags to the market. I was looking for a lightweight camera bag to hold all of my photographic gear, and there was nothing desirable on the market that suited my needs. After spending 2 years with many prototypes, the Gura Gear Kiboko bag was born. More products are now available on the Gura Gear web site.


Search
Friends
Sunday
Oct122008

Photo Safari 101: Types of Safaris

There are many different types of safaris in Africa, and one should understand the differences between them. Here are some basic ideas of what the different types of safaris are, and what you might expect if you are to join one of these trips.
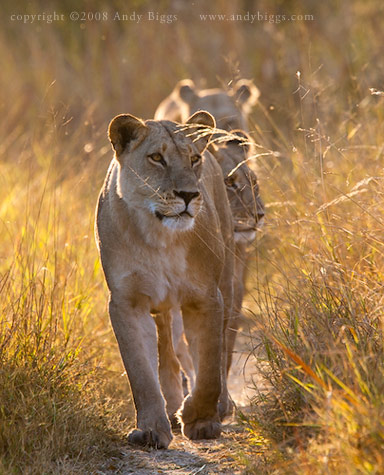
Photographic Safari

This is probably the most obvious and most requested of the safaris in Africa, although what is actually delivered can vary widely. Simply put, the photographic safari is a safari where photography is the primary purpose of the trip. Sometimes a photographic safari is really just a wildlife viewing safari and nothing else, and sometimes the safari can be a trip where all travelers are photographers with tons of equipment and photography is the only concern. And sometimes it is something in between. Some photographic safaris are safaris that have been put together for a group of people, possibly up to 12 people (like my own safaris), some safaris have a heavy teaching component to them, and some are nothing more than a safari that has been put together by a group of friends that are also keen photographers.

When I think of a photographic safari I think of like-minded people on safari that have photography as their main goal for the trip. I know that my photographic safaris are this way, with the added benefit of having leader of the group that is a photographer than also enjoys teaching photographic skills in a relaxed setting.

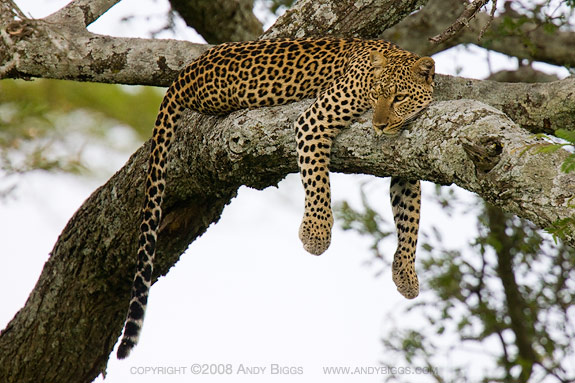
Leopard, Serengeti National Park, Tanzania. January 2008

Canon 1DsMkIII, 400mm f/4 DO IS + 2x TC, 1/250 @ f/8, ISO 1600


Walking Safari

Walking safaris are a great option for those travelers who are seeking a different view, as well as some exercise. Walking safaris can be extremely rewarding, as one is able to see and feel things that you cannot see from a vehicle. I have been on some amazing walking safaris where we were able to track white rhinos; something that is a much different experience when attempting from a vehicle. Many walking safaris focus on the smaller items, such as bugs, birds, trees, shrubs and tracking. A typical walking safari will take place in locations where there are fewer predators.

Cultural Safari

A cultural safari is one where the goal will be to interact with local communities. I have seen a trend in the industry to offer extensions to photographic safaris where there is a 'day of service' at the end of the trip. These days of service are opportunities to give back to communities in need, whether it is building schools, teaching a language, holding orphaned babies or just playing with children. Other types of cultural safaris might center around visiting villages for photographic opportunities. The ancient cultures of Ethipoia, the Maasai of Kenya and Tanzania, the Himba of Namibia come to mind.

Honeymoon Safari

Honeymoon safaris are typically private safaris, where the honeymooning couple arrange for a private vehicle and guide, and is setup as a custom itinerary.

Private Safari

A private safari might be one where you setup a custom itinerary, as opposed to selecting from a list of departure dates for itineraries that are shared with other people in a group. A private safari is one where the safari vehicle(s) is/are setup for the sole use of the travelers. Photographers often opt for such a safari, as photographers enjoy having more room in a vehicle for their camera gear. These photography trips could also be classified as group safaris, depending on the number of people on the trip.

Group Safaris

It is common in the safari industry for travel companies to publish a list of departure dates, and might allow for a maximum of 8 to 12 to 20 people in the group. The benefit is typically a cost savings.

Self Drive Safaris

There are some countries and parks that are excellent locations to do a self-drive safari. Countries such as Namibia, Botswana and South Africa are, in my opinion, the best self-drive locations.

Luxury Safari

This is a fairly obvious safari category!

Overland Safari

Overland safaris are setup as long journeys across multiple countries, often traveling over a month or longer period. The mode of travel is a large 4 wheel drive truck, and can accommodate up to 25 passengers. All travelers pitch their own tents, and often participate in the cooking and cleaning up of meals. This type of safari is attractive to college age travelers, and is quite affordable if you are willing to rough it for a little while.

Safari Extensions

Even if you book one of the safari types above, you can always add an extension to try something different. Here are some popular safari extensions:

  • Victoria Falls
  • Hiking with wild chimpanzees
  • Explore Capetown
  • The beaches of Zanzibar
  • Hike Mount Kilimanjaro

In summary, there are many different types of safaris offered, and you should choose the type that best fits your needs. Since I am a photographer, I am mostly interested in visiting locations that have the best photography, but I am also interested in visiting locations that have the best vehicles for photographers, flexible dining schedules (we are out early and come back late), excellent guides and abundant wildlife.

Sunday
Oct122008

One on One Printing mentoring

If you are interested in creating better photographic prints, I am now offering private full-day mentoring sessions at my printing studio. This is an opportunity for you and I to work side by side to create beautiful prints from your own digital files. We can work on whatever you wish to work on, from digital capture to Lightroom workflow to digital output. The world is your oyster, and I am here to assist. Typical items that are usually covered:

  • Color management
  • Lightroom processing and workflow
  • Soft proofing
  • Black and white printing
  • What to look for in a good print
  • Paper choices
  • Print sharpening
  • Upsizing files for large format output
  • Editing images for a portfolio
  • Mat cutting and presentation ideas

These sessions are very informal, and are designed around getting information to you that is relative to your goals.


My location and equipment

Here is the equipment that I have in my studio in Houston, Texas (Memorial area, west of downtown):

  • Canon iPF 8300 large format 44” 12-ink pigment ink printer
  • Epson Stylus Pro 3880 17” pigment ink printer
  • Epson Stylus R2400 13” pigment ink printer
  • Epson Stylus R2880 13” pigment ink printer
  • Epson Stylus R3000 13” pigment ink printer
  • Canon PRO-1 13” pigment ink printer
  • Canon PRO-10 13” pigment ink printer
  • Canon PRO-100 13” dye ink printer
  • Mac Pro desktop
  • Dual LCD displays (NEC PA-272W 27” and Apple 30” Cinema)
  • X-Rite i1 and iO scanning table for profiling
  • X-Rite iSis
  • GTI display booth with D50 light source
  • Epson V750 flatbed scanner
  • Plenty of workspace to layout prints
  • All Moab Paper products, including Colorado Fiber Satine, Entrada Bright 300gsm, Somerset Museum Rag, Silckrock Metallic Pearl as well as Crane Silver Rag, Epson Exhibition Fiber, Hahnemuhle Fine Art Pearl and Photo Rag.

The Cost

The cost of this all day (10 hours) session is $950, and will include the use of all printing materials, matting materials and perhaps the use of my assistant’s time if he is around to help out. A typical day will begin at 8am, and will end around 6pm. I have found it best to have a casual lunch break away from the studio to break the long day up. Oh, and lunch is on me. I also have an espresso maker in the office for those who need caffeine at all hours of the day.

The Signup process

All you need to do is to send me an email at andybiggs@gmail.com, and we can take it from there. My schedule is busy with Gura Gear and my photographic safaris, but we can carve out some time that works for both of us.

Friday
Oct102008

Photo of the Day

Kolmanskop, Namibia. September 2008

Canon 1DsMkIII, 16-35mm, 1/20 sec @ f/8, ISO 100

I absolutely love photographing the deserted mining town of Kolmanskop, Namibia. It is an excellent location to exercise many different techniques: low light photography, reflected light studies, architecture and color. This is one of those unique locations where you can photograph at any hour of the day, as most of your shooting is done indoors. I had passed by this scene earlier in the morning, but there really wasn't much to photograph. I came back later, and as I was passing by the house I noticed the light coming through the wooden slats in the ceiling. Bravo! It was great seeing this room come into its own, with all of the light patterns reflecting off of the blue and yellow walls. It may not be noticable in this small representation on the blog, but I like how the sand dune is framed through the doorway. Cool light = foreground and warm light = background.

Tuesday
Oct072008

Botswana: What worked and what did not

Yawning Lioness, Vumbura Plains, Botswana

Canon 1DsMkIII, 400mm f/4 + 1.4x, 1/320 sec @ f/8, ISO 400

The second part of my southern African safari took place in the country of Botswana, and was geared towards 100% wildlife photography. I put this trip together with Michael Reichmann, and we had 11 particpants plus a few non-photographing spouses on this trip. I have to admit that this particular safari was one of my most favorite trips to date, and I want to personally thank everybody who made this trip a very memorable one. The safari was not without its issues for me personally, as I was worried about my family back home. They were hunkered down to survive a direct hit from Hurricane Ike as I was out on a beautiful game drive in the Okavango Delta. Sometimes life throws good things at you at the same time you are thinking of something else or somebody else. My family handled the storm quite well, but I was glad to get back home to be with them when my safari was through.

As this photographic safari was dedicated for 100% wildlife, my equipment mostly reflected this intention. The challenge was my packing for two different safaris in two different countries; Namibia and Botswana. If I had only a wildlife safari in Botswana my equipment selection might have been slightly different. Here is what I took with me:

  • Canon 1DsMkIII (x2)
  • 16-35mm f/2.8 L
  • 24-105mm f/4 L IS
  • 70-200mm f/2.8 L IS
  • 400mm f/4 DO IS
  • 1.4x teleconverter
  • Gitzo GT3540LS tripod and RRS BH-55 ballhead
  • 116GB of CF cards

Lechwe, Mombo, Moremi Game Reserve, Botswana. September 2008

Canon 1DsMkIII, 70-200mm, 1/500 sec @ f/11, ISO 400


We had three different locations on this Botswana safari:

  1. Vumbura Plains, Okavangao Delta
  2. Private Mobile camping, Moremi Game Reserve, Okavango Delta
  3. Mombo Camp, Moremi Game Reserve, Okavango Delta

My primary wildlife lens on this trip was the Canon EF 400mm f/4 DO IS. I love this lens, because it is a small and lightweight telephoto lens. It weighs less than the 300mm f/2.8, and is roughly 1/2 the weight of the 500mm f/4. Optically speaking my 500mm f/4 is a better lens, but the larger 500mm is less manueverable when shooting from open vehicles. Why would a 500mm be more difficult? The easiest and most common way of supporting a long lens is by using a monopod. A monopod is a great tool, but requires setting up and getting ready for a shot. I have found that in some situations I can hand hold a 400mm f/4 for my initial shot, and then will put the lens on a monopod for situations when I have the time to sit and wait for the perfect shot.


Picnic Lunch, Monopods and Elephants, Mombo, Botswana. September 2008

Canon 1DsMkIII, 70-200mm, 1/250 sec @ f/8, ISO 200

I did find that many of my photographs were either too tight or too loose from a composition standpoint. So I wish I had some focal lengths in between 200mm and 400mm. Hello, Canon, can you hear me? I love the Nikon 200-400mm f/4, and someday I just might buy a D300 or D700 to go along with it. Am I ready to bail on Canon? Not really, but the 200-400mm is definitely the best wildlife lens on the market at the moment. I value the ability to properly frame a shot, and many of my images as of late tend to be taken with shorter focal lengths. 5 years ago most of my images were captured at 500mm, and these days they seem to be taken between 100mm and 300mm.

Running Elephant, Vumbura Plains, Botswana. September 2008

Canon 1DsMkIII, 400mm f/4 DO, 1/8 sec @ f/16


What worked?

I think my outfit worked pretty darn well. I absolutely love having a pair of 1DsMkIII bodies, and the lenses I chose worked fairly well. A 70-200mm f/2.8 L IS is a fantastic lens for shooting from helicopters, but given ample light I could also make a case for using the 100-400mm.

What did not work?

I wish I had my 100-400mm zoom with me, primarily because I either had too much lens or too little. Since Canon doesn't make a 200-400mm f/4, the 100-400mm is the next best thing. I typically shoot my zoom lenses between f/8 and f/14, and the 100-400mm lens works well once stopped down a little bit (It isn't that great when shooting at wide open apertures, though).


Oxpeckers, Mombo, Botswana. September 2008

Canon 1DsMkIII, 400mm f/4 + 1.4x, 1/640 sec @ f/6.3, ISO 400

Conclusion

This Botswana safari was filled with an enormous amount of great safari experiences, and I look forward to going back to Botswana in July 2009. I will have a different setup with me, but will it contain some Nikon equipment? We shall see. If Nikon has a camera that captures larger files, that will certainly make my life much easier. I don't like obsessing about equipment, as it does take away from one's capacity to think critically about what they are about to photograph. I enjoy every second when I am out on safari, and that is what I value most: the experiences. I just hope that I come back home with photographs to go along with those experiences, and that those photographs stir my soul. I am just starting to dive into my Botswana images, and I can easily say that some of these images bring a smile to my face.

Wednesday
Oct012008

Photo of the Day

Afternoon Walk

Vumbura Plains, Okavango Delta, Botswana. September 2008

Canon 1DsMkIII, 400mm f/4 DO IS, 1/400 sec @ f/8, ISO 800

Tuesday
Sep302008

Namibia: What worked and what did not

Now that I am home and settled, I am looking back at my past two safaris in Namibia and Botswana and I have some thoughts about what worked and what did not. This entry will only relate to my Namibia safari, and I will post a separate entry that is specific to my Botswana safari.

Since my Namibia safari was followed by a wildlife-only safari in Botswana, many of my equipment choices were skewed in favor of shooting wildlife instead of landscapes. Our Namibia safari had three different locations, and here they are with the primary subjects:

  1. Kolmanskop ghost town: deserted mining town with sand in and around the buildings
  2. Namib-Naukluft Park: tallest sand dunes in the world
  3. Ongava / Etosha: desert wildlife
In summary, 2 out of our 3 locations were for landscapes and the last location was 100% wildlife. And my Botswana safari afterwards was 100% wildlife, so my equipment choices needed to be chosen wisely as to optimize weight and bulk. Here is what I packed:


  • Canon 1DsMkIII (x2)
  • 16-35mm f/2.8 L
  • 24-105mm f/4 L IS
  • 70-200mm f/2.8 L IS
  • 400mm f/4 DO IS
  • 1.4x teleconverter
  • Gitzo GT3540LS tripod and RRS BH-55 ballhead
  • 116GB of CF cards

All of this gear was packed inside a Gura Gear Kiboko camera bag for international travel, as well as use in the field. Yes, I know I have mentioned Gura Gear in the past (just a few times), and we will be launching the site very very soon. The final touches are being worked on this week. For those shoots when I only needed 1 camera and 2 lenses, I chose my Mountainsmith Tour waist bag with Domke padded inserts. This worked extremely well, but so would a photo vest or belt system. Now I will break down each of the locations with what gear was used and what I will do differently next time.

Kolmanskop

My primary method for shooting at Kolmanskop was to have a camera and a lens mounted on a tripod, carried over my shoulder, with a second lens, filters, water bottle and extra CF cards in my Mountainsmith Tour bag. This worked extremely well on my last trip to Namibia in 2006, and it did not disappoint this time around. Kolmanskop is a deserted mining town where the primary photographic subjects are the interiors of the dwellings with tons of sand inside. My primary lens was the 16-35mm, but switched out with the 24-105mm quite often.

Kolmanskop, Namibia. September 2008

Canon 1DsMkIII, 16-35mm f/2.8 L

Namib-Naukluft Park

The Namib desert at Sossusvlei and Deadvlei tend to vary from subjects that are close to the camera (the dead trees at Deadvlei) and subjects that are far away from the camera (the tall sand dunes at Sossusvlei and the rest of the park). For this reason I chose to work primarily with the 70-200mm and 24-105mm lenses. The tall dunes pretty much work best with a longer lens, and I probably used the 70-200mm most of the time. Yes, I did use the 24-105mm some, but not very much. I used the 24-105mm 50% of the time and the 70-200mm the other 50% of the time at Deadvlei.

Deadvlei, Namib-Naukluft Park, Namibia. September 2008

Canon 1DsMkIII, 70-200mm f/2.8 L IS

Sossusvlei, Namib-Naukluft Park, Namibia. September 2008

Canon 1DsMkIII, 70-200mm f/2.8 L IS


Etosha and Ongava

We stayed at Ongava Tented Camp for 3 nights, which was in the middle of Ongava Game Reserve. Ongava Game Reserve borders Etosha National Park, so we could choose to stay on the reserve or head into the park on a game drive by game drive basis. My main lens for wildlife on this trip was my trusty 400mm f/4 DO IS, which tends to go with me everywhere in Africa outside of Tanzania. Why? I value the smaller and lighter lenses like the DO over larger and heavier lenses like the 500mm f/4. My primary stabilization device was a Gitzo carbon fiber monopod, which allowed me to move between each side of the vehicle easily. I was also working with an experimental support system that an equipment manufacturer and I are working on. Hopefully this item will make it to market and others can benefit from its rock-solid platform. I am not at liberty to share photos of the setup at this time, but the goal is to have a product that is versatile, lightweight, easy to pack, and modular. All of these requirements have been met, but the system as it stands right now isn't ready to bring to market.

I used the 1.4x teleconverter 50% of the time, and sometimes wished for more focal length for extremely tight shots.

Okaukuejo, Etosha National Park, Namibia. September 2008

Canon 1DsMkIII, 400mm f/4 DO IS

What worked?

I loved having two identical cameras, and I wasn't fiddling with a different layout. On my last trip to Namibia, I took a Canon 5D and a 20D. I loved the lightweight approach, but I have since abandoned non 1-series Canon cameras in favor of larger file sizes, more durability and better weather sealing. Namibia is a location that has the ability to push one's equipment to the extreme, but on this trip we didn't have as strong winds to complicate things. In 2006 I had to send in all of my lenses for repair as the result of sand getting into the focusing rings, adding up to more than $600 in total. I was smarter this time and protected my equipment much better, but we didn't have to contend with light sand storms, either.

My lens choices turned out to be perfect in all ways. If I didn't have a trip to Botswana on the heels of the Namibia portion, I would have given though to bringing a 70-200mm f/4 L IS lens. I love reducing weight when I can, and that lens would help in that regard. I am going back to Namibia next May, and will be running two landscape-only workshops, and I am likely to take some creative risks and only bring with me a panorama film camera. Namibia screams for a panorama representation, and just might go that route. For those who are joining me next May, if you own a medium format digital camera this is your best opportunity to put the gear to use!

The Gura Gear Kiboko bag is the best bag to work out of when I have more gear than just a camera and 2 lenses, and is the best bag for traveling internationally with a ton of gear. The Kiboko bag weighs only 4 pounds, and converts from a traditional backpack into a carrying bag. This means that the harness system can be stowed away when you don't want it in your way. This is a great feature when you are shooting from a safari vehicle, and the bag is sitting next to you on the seat. I can have 3 cameras mounted to lenses ready to shoot with, all ready to go and sitting in the bag. For example, a camera + 400mm, a camera + 24-105mm and a camera + 70-200mm. All ready to use, and sitting in a padded bag at my side.

On a non-photographic equipment note, I am glad that I brought along my lightweight hiking boots, as it prevented tons of sand from entering my shoes when hiking in deep sand. The high-tops worked great in this regard.

I brought along 116GB of total compact flash card memory, along with my Apple Macbook Air notebook computer and external hard drive. To be honest, I love not having to deal with the daily downloading of images. It always seems to interfere with my ability to get ready for dinner and get to the bar quickly for a nice, cold beer. I am not a heavy drinker, but I do enjoy a pre-dinner adult drink. And after dinner I am usually ready to crash for the night. When I had the time, I would copy a full CF card to my Macbook Air or external hard drive as my backup. My approach is to not overwrite a CF card at all on a trip, and it worked out quite well this time. The only challenge is that I shot around 108GB of images, and I should consider buying a few more cards before my next 3-week safari to Tanzania in January. If a new Macbook Air with a larger SSD drive comes out soon, I will also consider upgrading. This will allow me to ditch the external hard drive, and can use the Macbook Air as the backup for my images.

What did not work?

This was my first trip with my new AMOD AGL3080 gps logger device, and I learned a few things. The AMOD device uses three AAA batteries, which I don't particularly care for. I would rather use two AA batteries than three AAA batteries, primarily because of an even number approach. I brought along lithium batteries instead of rechargeables, and that was a poor choice. I found that I was measuring out how many hours I was getting per set, and was going to cut it close on the total number of batteries needed. The AMOD is a great device that gets somewhere around 12 hours of use on a set of alkaline batteries, and about 16 hours on a set of lithium batteries. I haven't used it with rechargeables yet, but I hear they are somewhere between 12 hours and 15 hours. On my next photographic trip, I will bring along at least 3 sets of AAA rechargeables and I will just leave the logger on all day long. I found that in my attempt to save batteries, I would forget to turn on the AMOD unit for the first part of our afternoon game drives. If you are in the market for a small, lightweight gps logger you should consider the AMOD GPL3080. When you plug it into your computer, it mounts as an external hard drive. This means that there is no software involved to remove the log files from the device. Just plug it in via USB and you are good to go.

There were many times at Etosha when I wished I had focal lengths in between 200mm and 400mm, though. I really missed my versatile 100-400mm lens, but I have to say that this is yet another one of those situations when I had the Nikon 200-400mm f/4 in my arsenal. Who knows what will happen in the next few years, but I could be convinced to shoot with Nikon gear if Canon doesn't bring out something similar in the next year or two.

My Mountainsmith Tour bag worked fairly well, but I am likely to use a belt system next time.

Conclusion

This Namibia trip was one of the most productive trips in the past few years, and I don't have any equipment regrets at all. Everything pretty much worked well as planned, except for my batteries on my gps logger. Live and learn. I look forward to returning next May, and will be in a better position to leave some weight behind (no long lens needed for wildlife) and might go with an all-panoramic storytelling point of view. We shall see.


Monday
Sep292008

Photo of the Day

Namib-Naukluft Park, Namibia. September 2008

Canon EOS 1DsMkIII, 24-105mm f/4 L IS

Saturday
Sep272008

Finally home

Well, we finally moved back home last night as our electricity has been restored to our house. We are extremely grateful to have both of our families near us and also for all of their support in the aftermath of hurricane Ike. Even though I slept a few evenings at the house this past week in the heat, I really haven't felt like I was back home and in my own house without all four of us here at the same time. It had been a month since I have been in the house with all of my family!!

Now it is time to get back to a normal work schedule to catch up on print orders, return emails and phone calls, and above all else see Gura Gear finally launched and out in the open.